How to Clip a Horse: A Beginner’s Step-by-Step Guide
Published on: March 30, 2026 | Last Updated: March 30, 2026
Written By: Henry Wellington
Hey there, barn friends. That first look at the fuzzy winter coat coming in can spark a wave of anxiety-tangled cords, a nervous horse, and the fear of a bad clip job are real concerns.
I’ve been there, with a sweaty horse after a light workout and the looming dread of longer drying times and potential chills. Getting it right matters for their comfort and health.
This guide will walk you through the entire process safely. We’ll cover:
- Choosing the right clippers and blades for your horse’s coat and your budget.
- Prepping your horse (and your workspace) to ensure a calm, safe experience.
- Step-by-step clipping techniques and patterns for a neat, functional finish.
I’ve spent over a decade as a barn manager and trainer, helping everyone from first-timers to seasoned pros navigate clipping season with confidence and care.
Why You Should Clip: More Than Just a Haircut
Clipping your horse is a direct act of care, not a cosmetic whim. Managing sweat is the top reason: a soaked winter coat takes hours to dry, chilling your horse and risking a cough or skin funk. For the working horse, removing hair lets them cool efficiently, so they don’t waste energy overheating under a furry blanket. This ties directly to equine welfare-a comfortable horse is a healthy partner.
I learned this with Luna, my high-energy Thoroughbred. Her dapple grey coat would be wringing wet after a brisk winter workout, and she’d stand there steaming and miserable. A strategic clip transformed her recovery; she dried fast and stayed bright-eyed, ready for her next turnout session.
Common scenarios where clipping helps:
- The Winter Athlete: Like Luna, any horse in regular work during cold months benefits from a trace, blanket, or hunter clip.
- The Fuzzy Pasture Pet: Even retired Rusty, my Quarter Horse, gets a neatening up. His senior metabolism doesn’t regulate temperature as well, and a clean belly clip helps him stay comfortable through wet, muddy weather without getting bogged down.
- The Easy Keeper: Portly ponies or horses prone to heavy coats can overheat even on cool days; clipping helps manage their condition.
Forget the idea that body clipping is only for show ring perfection. This is a practical stable management tool for any owner who values their horse’s comfort and health during ridden work or changing seasons.
When the Clippers Come Out: Timing and Seasons
Timing is about reading your horse’s coat and calendar. The first clip often happens in early fall as the winter coat comes in but before the serious sweat sessions begin. You can clip as needed throughout the cold months, typically every 4-6 weeks as hair regrows.
Let workload guide you. A lightly ridden horse might need just one clip, while a stable like mine with varied athletes requires a schedule. Always ensure your horse has fully grown their winter coat before that first clip-you can’t put the hair back on. For spring, I stop clipping once the days consistently warm, letting the summer coat come through naturally. Winter vs summer grooming has its own key differences in clip timing and coat care. More tips on these seasonal differences will be linked in the next steps.
Your Clipping Toolkit: Gear Up for Success
Gathering the right gear turns a daunting task into a smooth operation. Your toolkit is your first line of defense for a safe, stress-free experience for both you and your horse. Here’s what you need on hand:
- Clippers: The main event. For beginners, cordless models are a game-changer for maneuverability and safety-no cord to trip over or for a spooky horse to step on.
- Blades: A sharp #10 blade is the universal starter. Dull blades pull hair and heat up, so having a spare set is wise.
- Cooler or Stable Sheet: To throw on immediately after clipping to prevent a chill.
- Grooming Brushes: A stiff curry and soft brush to get every speck of dirt and loose hair off before you start.
- Safety Gear: Hearing protection for you (clippers are loud), and a secure halter and lead rope. Some folks use a grounding strap for corded models.
Investing in a good pair of clippers and learning to maintain them is cheaper than a vet bill for a chill or a costly professional clip job. Corded clippers offer constant power but limit your range; cordless models offer freedom but require battery management. For your first time, simplicity is key.
Clipper Care 101: Oil, Clean, Repeat
Treat your clippers like a trusted farrier tool. A well-maintained clipper will hum smoothly, glide through the coat, and last for years. Follow these steps every single time you use them:
- Warm Up: Turn the clippers on and let them run for a minute before touching them to your horse. This gets the motor warm and lets you listen for any unusual sounds.
- Oil During Use: Every 5-10 minutes, stop and add a few drops of clipper oil to the blades. The smell of warm oil means you’re doing it right. This reduces friction and keeps the cut clean.
- Clean Afterward: Brush all hair out of the blades and housing. Wipe the body down. Then, use a blade wash solution to disinfect the blades before storing them. Dirty clippers are a primary source of skin irritation and poor performance.
That rhythmic thud of hooves in the background is your soundtrack-keep your tools in tune with it. Sharp, clean blades make the job faster and more comfortable, turning a potential battle into a bonding session.
Pre-Flight Check: Preparing Horse and Space
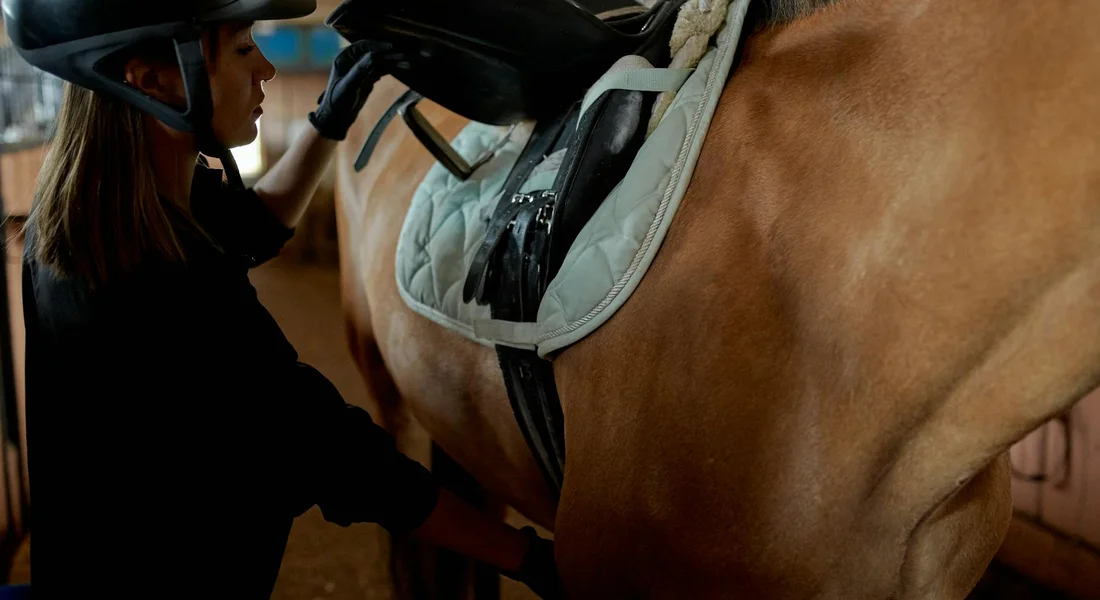
Before you even touch the clipper switch, your preparation sets the tone for the entire job. A rushed start leads to a frazzled finish.
- Secure your horse in a familiar, safe location. I always use a set of sturdy cross-ties on solid rubber mats, or have a reliable helper hold the lead. A loose horse in a clipper panic is a recipe for disaster.
- Give a detailed grooming. Brush out every speck of dirt and any matted hair. Clipping over grit ruins blade edges and scratches sensitive skin. Your horse must be completely dry; even dampness can cause clipper burn.
- Desensitize to the noise with positive reinforcement. Turn the clippers on at a distance, letting that familiar buzz become background noise. Reward calm behavior with a favorite treat. With my high-strung Luna, we practiced for days, pairing the sound with carrot chunks until she sighed in boredom.
- Set your stage. Choose a well-lit, clean area with non-slip footing. You need to see every hair and contour. For your first time, enlist a helper-they can manage the lead rope, offer treats, and provide a second set of eyes.
The Calm Introduction: Letting Your Horse Investigate
Start with everything powered down. Let your horse see and sniff the clippers. I lay them flat on my open palm and offer them like a strange piece of tack. This initial curiosity is your greatest ally for building trust. Be patient and consistent—that’s how you begin building a strong bond and trust with your horse. In the next steps, practical ideas will unfold to deepen that connection.
I remember Pipin the pony’s first introduction. As a champion escape artist, I expected drama. Instead, he spent a solid ten minutes meticulously lipping the clipper casing, snorting at the cord, and deciding it was not a food item. His intelligent, food-motivated brain had to categorize it first. That investment in time meant he stood perfectly still for his first bridle path trim. Let your horse’s curiosity lead the way.
The First Swipes: A Step-by-Step Beginner’s Guide
- Begin with confidence-building trims: the bridle path and fetlocks. Use a small trimmer for control. A short, clean bridle path prevents the headpiece from rubbing, and neat fetlocks stop mud from clumping. This small success is a win for you both.
- Move to a forgiving, flat area like the neck or shoulder. Press the clipper body flat against the coat and move in the direction of hair growth. Long, overlapping strokes prevent unattractive lines. Think of it as mowing a lawn in straight rows.
- Navigate body contours like the barrel and hindquarters. Keep your hand steady and the blades flat. Use your free hand to stretch the skin taut over curved muscles. Skin tension creates a smooth surface and prevents nicks, much like stretching canvas before painting.
- Approach tricky zones-legs, ears, poll-with guarded blades and infinite patience. For legs, hold the hoof comfortably. For ears, let the horse feel the vibration on your hand first. I always use a #10 blade with a plastic guard for ears and the poll for safety.
- Finish with the details. Neaten the mane line, trim the forelock, and define any saddle patch. Step back frequently to check your work is even. A balanced clip is pleasing to the eye and functional for the horse.
Finding Your Rhythm: Pace and Pressure
- Maintain a slow, consistent pace. Rushing creates uneven patches and stresses your horse. Find a rhythm you can hold for an hour, like the steady stroke of a curry comb during grooming.
- Let the clippers’ weight do the work; avoid pressing down. Excessive pressure heats the blades, dulls them quickly, and irritates the horse’s skin. Your touch should be firm but gentle.
- Monitor blade temperature constantly. I test them against my wrist every few minutes. A hot blade is a burning blade. Have a second set ready or use a cooling spray.
- Schedule breaks. Pause every 15-20 minutes to let your horse relax, offer water, and check for any signs of skin irritation. This is a marathon, not a sprint.
Choosing a Clip Style: Start Simple and Practical
Picture this: it’s a crisp morning, and your horse comes in from turnout with a coat so thick it could double as a bear rug. You know clipping is the answer, but where do you even start? Begin with a clip that matches your horse’s actual workload, not the one you dream about. I learned this the hard way with Luna; clipping her like a show horse when she was only in light work left me blanketing constantly. For beginners, focus on these three forgiving styles that remove hair only where it’s needed most—it’s a bit different than grooming a horse for a show or competition.
- Trace Clip: This is your go-to first clip. You simply trace the areas where sweat pools-the neck, chest, and belly. It’s perfect for the horse in light work or weekend trail rides.
- Blanket Clip: Imagine leaving a furry rectangle over your horse’s back and hindquarters. You clip everything else. This style suits a horse in regular training who needs to stay cool but retain some back warmth.
- Half Clip: Here, you clip the entire lower half of the body, from an imaginary line drawn from the point of shoulder to the point of buttock. It’s a step up for the good-doer who sweats heavily but still lives out part-time.
Styles like a full body or hunter clip are for horses in intense, daily work. They require expert blanketing systems and are best left for when you’re comfortable with your clippers. Your goal is to help your horse, not create a full-time blanketing headache for yourself. This table helps match the clip to your reality.
| Clip Style | Best For | Coat Removal Level |
|---|---|---|
| Trace Clip | Pleasure or light-work horses; reduces sweat without over-clipping | Light (neck, belly, chest) |
| Blanket Clip | Horses in regular training or moderate work | Moderate (removes hair from neck, chest, belly, leaves a blanket on back) |
| Half Clip | Horses that sweat heavily but still need some protection | Moderate to High (clips lower body fully) |
| Full Body Clip | Show horses in intense, daily work | High (removes all body hair) |
| Hunter Clip | Field hunters or horses in prolonged, vigorous activity | High but Strategic (leaves legs and patch under saddle) |
The Trusty Trace Clip: A Great First Project
If you only remember one thing, let it be this: start with a trace clip. The low stakes of this clip build your confidence and teach your horse that clippers aren’t scary. I practiced on old reliable Rusty, who would do anything for a peppermint. Here’s how to do it.
- With clean, dry horse and sharp blades, start at the top of the neck where it meets the jaw. Clip downward in the direction of hair growth.
- Follow the natural sweat lines. Imagine where sweat drips after a ride-that’s your guide. Clip a line from the throatlatch down the neck, chest, and between the front legs.
- Continue the line along the belly, stopping before you reach the flank. You can take it high or low; a lower trace is more forgiving for a first try.
- Keep your strokes smooth and overlap them slightly to avoid stripes. Your final look should be a neat, inverted ‘U’ shape from neck to belly.
This clip is a workhorse for the pleasure mount or light trail horse like Rusty. It prevents that soggy, cold sweat under the girth and saddle pad without compromising his natural insulation for turnout. He stays comfortable, and you get practice without the panic of a perfect line.
After the Buzz: Post-Clipping Care and Common Hiccups
The last bit of hair hits the ground, and you breathe a sigh of relief. But your job isn’t done. Post-clip care is where you prevent skin issues and keep your horse content. That freshly exposed skin is sensitive, like a sunburn, and needs gentle attention.
First, blanket appropriately. A freshly traced horse often needs a light sheet in the stall and a turnout rug if it’s below 50°F or windy. Feel behind the elbow or along the neck; if the skin is cool, it’s time for a layer. Temperature should guide when to blanket. A well-chosen blanket helps maintain comfortable warmth as conditions change. I always keep a spare cooler handy for Luna after a clip.
Next, moisturize. A quick wipe with a damp cloth or a non-alcoholic grooming spray soothes the skin. Avoid heavy products that clog pores. Monitor for chills-if your horse is tucked up or shivering, add a blanket. Timing is key—our “when to blanket your horse” temperature care guide covers the cues you need. Use it as a quick reference as weather and turnout change. Advocate for a gradual return to full turnout; start with an hour on a mild day to let them acclimate.
Now for the hiccups. Nicks happen. Have a styptic powder or cornstarch ready to dab on small cuts. For uneven lines, don’t chase perfection in one session. Wait a day or two, then tidy up when both you and the horse are fresh. A fidgety horse means you’re moving too fast or the blades are pulling. Stop, check your equipment, and offer a reassuring scratch.
When Things Get Warm: Cooling Blades and Tempers
The hum of the clippers is soothing until the blades get hot and the horse gets tense. Managing heat is a non-negotiable part of gentle horsemanship. Hot blades burn skin and make horses understandably anxious.
Keep a can of blade coolant or a spare set of blades in a tub of cold water. Switch them out every ten minutes. Touch the blades to your inner wrist; if it’s uncomfortable for you, it’s too hot for your horse. This simple check saved me many times with the clever Pipin, who would bolt at the first hint of a warm blade.
When anxiety rises, stop. Let the horse lower its head and take a breath. Do the same yourself. Offer a bite of hay or a moment of just standing together. Rushing through a clip teaches a horse to dread it, but patience builds a partnership where they stand quietly for you. Remember, a twenty-minute break is always faster than repairing a broken trust.
FAQ: How Do You Clip a Horse for Beginners?
How can I calm my horse if they get nervous during clipping?
Stay patient and use positive reinforcement, like offering a favorite treat after each calm section. Take breaks often to let your horse relax and lower its head, preventing stress from building up. If anxiety spikes, stop completely, turn the clippers off, and simply stand together to rebuild trust before continuing. These steps also help stop a horse from bucking when stressed. A calm, cooperative horse is easier to manage during tricky moments.
What blade should I use for my horse’s specific coat type?
A sharp #10 blade is the versatile standard for most beginner clips on a typical winter coat. For a particularly thick, dense coat, you might start with a coarser blade like a #7.5 to prevent the clippers from bogging down. Always have multiple sharp blades on hand to swap out as they heat up during the job.
Where is the safest place to make the first clipping stroke?
Begin on a forgiving, flat area like the neck or shoulder to build confidence for both you and the horse. Many beginners also start with small trims on the bridle path or fetlocks using a smaller trimmer for greater control. These areas are less sensitive and provide a successful first experience before moving to larger body sections. Once you’re comfortable with these basics, you can extend the same careful approach to grooming the mane and tail. The best way to manage your horse’s mane and tail helps keep them clean, manageable, and healthy.
A Barn Manager’s Parting Advice on Clipping
Begin with a patient horse, sharp blades, and a plan for the clip pattern you need. Move those clippers with the hair growth in steady, overlapping passes-rushing or going against the grain guarantees a jumpy horse and a choppy finish.
Listen to your horse’s breathing and body language more than your own agenda; a tense day means it’s time to stop and try again tomorrow. Good horsemanship isn’t about a perfect clip, but about ending with a calm horse who still trusts your hands.
Further Reading & Sources
- Which type of clip is right for your horse? Check out H&H’s helpful guide
- How to Body Clip a Horse: Tips and Patterns – My New Horse
- The Complete Guide to Clipping Your Horse – Equinavia
- Get the Best Body-Clip for Your Horse | US Equestrian
At Horse and Hay, we are passionate about providing expert guidance on all aspects of horse care, from nutrition to wellness. Our team of equine specialists and veterinarians offer trusted advice on the best foods, supplements, and practices to keep your horse healthy and thriving. Whether you're a seasoned rider or new to equine care, we provide valuable insights into feeding, grooming, and overall well-being to ensure your horse lives its happiest, healthiest life.
Basic Grooming Techniques