
How to Build Safe Shelter and Shade for Your Horse
Published on: October 9, 2026 | Last Updated: October 12, 2026
Written By: Henry Wellington
Hello fellow equestrians, is your horse sweating through its coat in the midday sun or huddling in a dusty corner when the rain pours? Without proper refuge, horses face sunburn, dehydration, and chill, turning routine care into a stream of vet bills and behavioral headaches.
Let’s fix that. In this guide, I’ll share my hard-won barn wisdom to help you construct a haven that your horse will actually use. We’ll break down the key steps:
- Site selection secrets that use natural landscape for protection.
- Material must-haves for walls and roofs that won’t injure or overheat.
- Ventilation designs that stop humidity from settling in your horse’s lungs.
- Cost-effective builds you can tackle yourself, without fancy tools.
- Seasonal tweaks to keep your horse comfortable in freezing winds and summer swelters.
With years of hands-on experience as a barn manager and trainer, I’ve seen how a well-built shelter can turn a restless herd into contented, healthy companions.
Why Every Horse Needs Real Shelter
I remember a scorching July afternoon, watching Luna, my sensitive thoroughbred, abandon her hay to press her entire body against the narrow strip of shadow cast by the fence post. That stark image cemented it for me: shelter isn’t a luxury; it’s a physiological need. Providing real cover is a non-negotiable part of preventing heat stress, which can swiftly escalate from heavy sweating to dangerous colic or heatstroke.
Beyond comfort, consistent protection from elements prevents a cascade of health issues. A horse caught in a cold, driving rain is at risk for rain rot, a miserable bacterial skin infection, and the energy they burn just shivering is energy stolen from maintaining condition. Wind chill can dip temperatures far below what the thermometer reads, making a dry, draft-free space critical for winter welfare, especially in colder climates where horses face challenging weather conditions.
- Sunburn: Especially for pink-skinned horses like greys, causing painful blisters.
- Dehydration: Without shade, horses drink less and lose more fluids, impacting everything from digestion to kidney function.
- Hoof Issues: Constant cycles of standing in wet mud then baking in hard, dry ground compromise hoof integrity and can lead to cracks or abscesses.
Gentle horsemanship means respecting the horse’s entire experience. Framing a run-in shed or shady grove as a cornerstone of ethical care champions their need for choice and comfort during their essential turnout time. It’s a simple act that says you see them as a partner, not just a pasture ornament.
Choosing Your Structure: From Run-In Sheds to Shade Cloths
Permanent Shelters: Barns and Run-In Sheds
For year-round peace of mind, nothing beats a permanent structure. The classic three-sided run-in shed is the gold standard for turnout areas. I’ve watched Rusty and his pals use theirs as a sunblock, raincoat, and windbreaker all in one day. The open design offers superior ventilation, reducing respiratory dust, and gives horses the freedom to come and go, which aligns perfectly with their flight instincts.
A closed barn offers more containment and deep winter protection but can trap heat and ammonia fumes if not meticulously managed. The key is matching the structure to your primary goal: for 24/7 turnout access, a run-in shed wins; for daily stalling, a barn is necessary.
When building or buying, sweat the details. A generous roof overhang of at least two feet keeps driving rain and snow from soaking the interior. Use sturdy, rounded timber framing-I’ve seen a horse spook and bump a hip on a sharp corner, and it’s a preventable injury. Always ensure the interior is a clear, safe space with no protruding nails, tight corners, or low beams where a horse could get trapped.
Portable and Cost-Effective Shade Solutions
For paddocks, rodeo arenas, or budget-conscious setups, portable shade is a brilliant hack. Shade cloth structures or pole tents provide flexible coverage. Look for fabric with a high UVR (Ultraviolet Reduction) rating-90% or better-because not all shade is created equal; a thin tarp might block light but still let harmful rays through.
Never underestimate a mature, healthy tree line; it’s nature’s perfect solar panel. For a quick fix, heavy-duty tarps can work, but secure them like your horse’s life depends on it. The sudden crack and flap of a loose tarp in a storm is a guaranteed equine panic trigger, so use robust straps and anchor points far from where a horse could become entangled.
- Shade Sails: Triangular or square fabric panels stretched between poles. Ensure they are tensioned correctly to shed water and wind.
- Portable Pop-Ups: Great for show grounds or temporary events. Weight the legs securely so a gust doesn’t turn them into a kite.
- Strategic Planting: If starting from scratch, plant fast-growing, non-toxic trees like poplars on the west side of your field for afternoon relief.
Designing for Safety, Durability, and Horse Psychology
Location, Size, and “Pasture Flow”
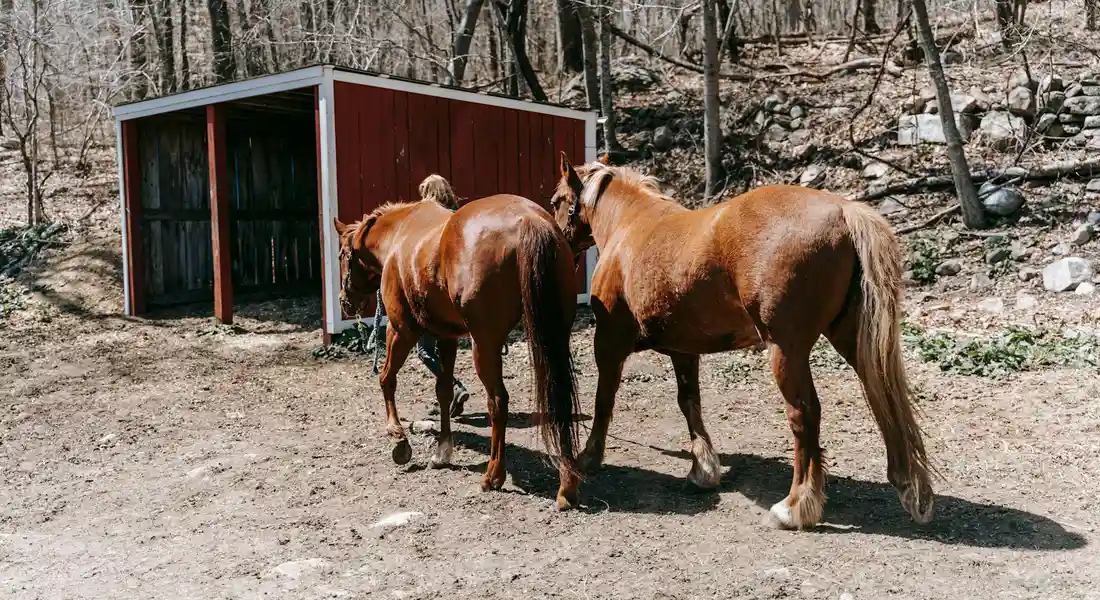
You can build the sturdiest shelter in the county, but if you put it in the wrong spot, your horses will stand in the rain next to it. Siting is everything when it comes to horse shelters. I learned this the hard way when a poorly-placed run-in became a giant, muddy soup bowl every spring.
Start with the land itself. Always pick the highest, best-drained ground you have on the pasture; a shelter should be a refuge from mud, not the source of it. Understanding essential horse housing land requirements helps ensure the shelter and paddock stay dry and safe. These guidelines also shape where you place structures and how you arrange access. Think about how your horses move. They need clear sightlines and multiple, wide openings so no one gets trapped. A bossy mare blocking the only door creates instant drama.
- Choose high ground for drainage. Your foundation will thank you, and you’ll avoid creating a bog.
- Ensure multiple escape routes. Two wide openings, ideally on different sides, prevent bullying and let horses escape weather from any direction.
- Orient away from prevailing winds and driving rain. In my area, that means the solid back wall faces the north-west winter storms.
- Integrate with fencing and water. Place it so the travel path to water doesn’t force a timid horse past a gate bully’s personal space.
For size, bigger is almost always better. The absolute minimum is 12’x12′ for one horse, but that’s just for standing. For true comfort and to allow lower-ranking herd members their own space, aim for at least 12’x24′ for two horses, adding 100-150 square feet for each additional animal. This extra room lets Pipin the pony duck around Luna the Thoroughbred without getting pinned in a corner. Pasture needs matter as well. Generally, plan about 1–2 acres per horse for grazing, depending on forage quality and grazing management.
Critical Safety Features You Can’t Ignore
Horses are accident machines wrapped in muscle and good intentions. Your job is to engineer out the risks. Every sharp corner is a future vet bill waiting to happen.
The non-negotiable safety checklist includes rounded interior corners, kick-proof walls (solid wood or specially designed mesh), doors and gates that latch securely but can’t trap a leg, and non-slip footing even when wet. Ventilation is a silent killer if ignored; stale, damp air breeds respiratory issues, so design for a constant, draft-free flow above horse height. Extend that safety mindset to the pasture: design a safe, effective horse pasture with fencing, drainage, and shade.
- Rounded Corners: A 6-inch radius on posts and wall junctions prevents deep, tearing injuries.
- Kick-Proof Walls: Use solid wood planks or heavy-duty, no-climb mesh designed for horses-never standard chicken wire.
- Secure Doors/Gates: All fasteners should be horse-proof, with sliding bolts or latches they can’t fiddle open. Hinges must be on the outside.
- Non-Slip Footing: Textured mats over a well-drained base are gold standard. Plain concrete is a hard no.
- Excellent Ventilation: A continuous ridge cap or high eaves allows hot, moist air to escape, pulling in fresh air.
Your work isn’t done once the last nail is driven. Establish a simple monthly maintenance walk-through: check for new chew marks, loose fasteners, protruding nails, and any wear in the footing. After every big windstorm or heavy snow, do it again. That creaking sound isn’t rustic charm; it’s a warning.
Selecting and Sourcing Your Build Materials
Framing and Wall Materials
Walking down the lumber aisle can feel overwhelming. Your choice boils down to wood, metal, or composites, each with a different personality and price tag.
Wood is the classic, forgiving choice. It’s easy to work with, repairable, and doesn’t resonate noise like metal can. Always use pressure-treated wood for posts and any ground-contact elements to resist rot, but ensure it’s rated for livestock use to avoid harmful chemical ingestion from chewing. For the chewers in your life, like Pipin, consider facing edges with metal angle iron.
Metal buildings are incredibly durable and low-maintenance, offering a smooth surface that’s harder to injure themselves on. The downside? They can be noisy in hail or rain, which may spook some horses, and they require careful insulation to prevent sweating and condensation. Composites are the new players-rot-resistant and often chew-proof, but at a significantly higher upfront cost.
Roofing and Flooring Options
The roof is your umbrella and the floor is your foundation. Get this combination right, and you’ve solved 80% of your weather problems.
For roofing, corrugated metal is durable and sheds snow well, but the drumming of rain can unsettle a sensitive soul like Luna. Polycarbonate panels are a brilliant alternative, letting in soft, diffused light without the greenhouse heat buildup, and they’re remarkably quiet during a storm. Whichever you choose, a slight overhang protects your walls and keeps driving rain from sneaking inside.
Underfoot, natural earth is cheap but turns to muck. A well-graded base of crusher run or coarse gravel, packed hard and crowned for drainage, is the minimum. Top this with heavy-duty interlocking rubber mats, and you’ve created a dry, supportive surface that eases joint strain and makes mucking out a five-minute job. This layered system encourages drainage down and away, leaving you with a dry, stable floor year-round. The thud of a hoof on a solid, dry mat is a sound of pure success.
The Step-by-Step Guide to Getting It Built
Step 1: Planning and Permits
Before you buy a single post or pick up a hammer, you have to navigate the human world’s rules. Your local county building department will have the final say on permits for permanent structures. Homeowner’s Association (HOA) rules can be even stricter. Ignoring this step can lead to costly fines or being forced to tear down your beautiful new shelter, which I’ve seen happen to a well-meaning neighbor. He built a lovely three-sided shed for his old gelding, only to have a county inspector show up two months later with a violation notice. The setback from his property line was off by five feet. It was a heartbreaking and expensive lesson in measuring twice and permitting once.
Step 2: Preparation and Foundation
A great shelter is ruined by a bad base. Start by clearing the chosen site of all debris, rocks, and vegetation. Next, grade the area so it has a gentle slope away from the shelter-about a 2% grade is perfect for water to run off without eroding the footing. Proper drainage is the unsung hero of any farm structure, preventing a boggy mess at the entrance every time it rains. For the foundation, I’m a firm believer in a deep, compacted gravel base topped with coarse, angular gravel. It provides stability, drains beautifully, and is easier on hooves and legs than concrete. For post-frame buildings, set your posts in concrete piers below the frost line to prevent heaving.
Step 3: Assembly and Final Safety Check
Whether you’re assembling a kit or building from scratch, this is where focus is everything. Use hardware designed for animals-rounded-head bolts, smooth screws, and always, always use lock washers or nuts. The final step before your horse moves in is a thorough hazard hunt. Run your hands over every interior surface. Get down on your knees and look from a horse’s eye level. To avoid common horse stable setup mistakes, take a quick risk review as part of your pre-occupancy plan. This helps catch issues before your horse moves in. Your pre-occupancy checklist must include:
- All hardware is tight, secure, and smooth.
- No protruding nails, screws, or sharp metal edges.
- Roofing is securely fastened with no loose panels.
- Interior walls are solid with no gaps or splintered wood.
- No loose wires, dangling ropes, or electrical cords within reach.
- The flooring/footing is even and free of tripping hazards.
This meticulous inspection is your last line of defense against a preventable injury, so take your time and be ruthless.
Keeping Your Shelter Safe Year-Round
Regular Maintenance Tasks
A shelter isn’t a “set it and forget it” project. It needs a caretaker. Create a simple seasonal routine. Every spring and fall, I do a full walk-around. Climb up (safely!) to check the roof for loose shingles or metal sheets, and clear leaves and pine needles from gutters and valleys. Inspect all wood for soft spots or rot, especially around the base. Look for rust on metal components. Inside, check the footing-top up gravel as needed and level out any holes pawed near doorways. And never forget to look up: wasps love to build nests in the eaves of a quiet run-in shed, a surprise neither you nor your horse will appreciate.
Seasonal Adaptations
Your shelter should work with the seasons, not against them. For winter, consider adding a sturdy, breathable windbreak on the prevailing wind side; heavy-duty canvas or a wooden panel can make a drafty shelter cozy. In the sweltering summer, your goal is maximum airflow-ensure vents are clear and doors are wide open. The true test of a shelter’s site preparation comes during the spring thaw and fall rains, where managing mud at the entrance becomes the daily chore. A generously sized pad of geotextile fabric and gravel extending out from the doorway is worth every penny and every shovel of stone you spread.
FAQ: How to Build Safe Shelter and Shade for Your Horse
Are horse shade shelter kits a practical choice for DIY construction?
Horse shade shelter kits can streamline the building process with pre-designed plans and materials, ideal for those with basic tools and skills. Ensure the kit specifies robust, weather-resistant components and includes safety features like rounded edges and secure anchoring. Always verify that the design allows for adequate airflow and drainage to match your local climate conditions. If you’re planning a DIY horse stall shelter, a step-by-step approach can help you stay organized. A clear step-by-step plan keeps the project on track from foundation to finish.
What influences the cost of horse shade shelters in regions like Toowoomba, QLD?
Prices in Toowoomba, QLD, depend on factors such as shelter size, material quality, and installation services, with kits often being more budget-friendly than custom builds. Local supplier competition, material transport fees, and seasonal demand can also affect overall expenses. Researching online reviews and comparing quotes from multiple vendors helps ensure value without compromising on durability or safety.
Where can I locate horse shade shelters for sale in Warwick, QLD?
Start by exploring local equestrian supply shops, farm equipment retailers, and dedicated online platforms that serve the Warwick area. Checking community boards or social media groups for horse owners can lead to recommendations and second-hand options. Prioritize sellers with positive feedback and insist on inspecting shelters for sturdy construction and horse-safe finishes before purchase.
A Final Word on Shelter
Your horse’s shelter needs enough space for everyone to lie down safely, requires excellent drainage to prevent muddy, hazardous footing, and must be built from durable, chew-resistant materials. When evaluating different shelter options, weigh their pros and cons to choose what best fits your setup. Above all else, a dry, well-drained base and a roof that provides a deep, consistent shadow are non-negotiable for true comfort and protection.
Take your time observing how your horse uses the space you’ve built—their habits are your best guide for adjustments. True safety comes from combining a sturdy structure with your daily attention to their comfort and behavior. This ties directly into creating a safe, enriching environment for your horse. In the next steps, we’ll weave in practical resources to support that enrichment.
Further Reading & Sources
- How to Build Shade Structures for Horses – USA Shade
- r/Horses on Reddit: Building a shelter for the pasture
- DIY Horse Shelter Using Sun Sail – Ginny’s Horse Product Review
- Horse and Livestock Shelter and Shade Structures
At Horse and Hay, we are passionate about providing expert guidance on all aspects of horse care, from nutrition to wellness. Our team of equine specialists and veterinarians offer trusted advice on the best foods, supplements, and practices to keep your horse healthy and thriving. Whether you're a seasoned rider or new to equine care, we provide valuable insights into feeding, grooming, and overall well-being to ensure your horse lives its happiest, healthiest life.
Stable Management