How to Mount and Ride a Horse with Confidence: A Beginner’s Guide
Hello from the barn aisle. I know that first ride can feel daunting-a mix of excitement and nerves, worrying about doing something wrong or startling your new equine partner. That feeling is completely normal; every expert rider was once right where you are, holding a halter and wondering where to even begin.
This guide will walk you through the first steps, from safe groundwork to that first smooth walk. We’ll cover safe tack checks, a steady mounting process, finding your balanced seat, and clear cues for walking and stopping. My advice comes from years of helping first-time riders and school horses like Rusty, who has patiently taught dozens of people that the journey begins with a single, confident step.
Gear Up: Your Pre-Ride Safety Checklist
Essential Personal Safety Gear
Before you even think about stepping near a stirrup, you need to suit up. This isn’t about fashion; it’s about creating a basic layer of protection between you and the ground. Your helmet is the single most important piece of equipment you will ever buy-treat it with the same seriousness as a seatbelt.
- ASTM/SEI Certified Helmet: This certification is non-negotiable. It must fit snugly, not rock side-to-side or front-to-back, and sit level on your head about an inch above your eyebrows.
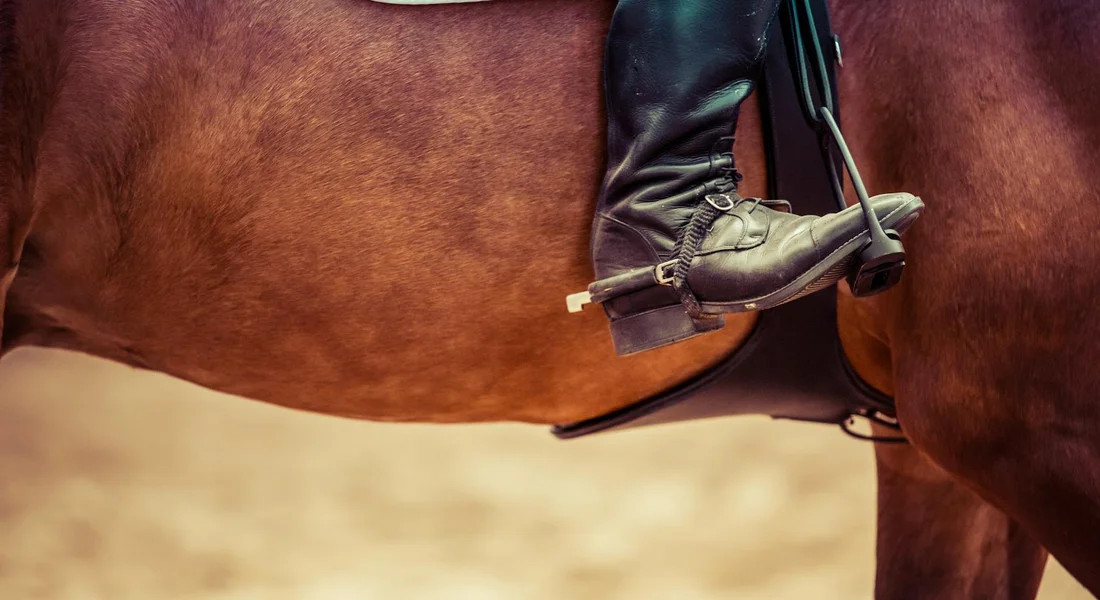
- Boots with a Defined Heel: A riding heel (about 1 inch) prevents your foot from sliding all the way through the stirrup. Choose sturdy boots that cover your ankle to protect it from pinches.
- Comfortable, Fitted Clothing: Avoid baggy pants that can catch or rub. Breathable fabrics are best, and gloves can save your palms from rope burn if you need to grab the reins quickly.
Tack Check: Saddles, Girths, and Bridles
A quick but thorough tack inspection is a ritual that builds trust and prevents mishaps. Listen for the quiet creak of leather and feel for secure buckles. This two-minute check is your best defense against a tack-related surprise at the mounting block.
- Start on the Left: Always approach your horse from the near (left) side. Check that the saddle pad is smooth and centered, with no wrinkles to cause rubs.
- The Cinch or Girth: Run your hand under it. It should be snug, but you should still be able to comfortably fit your fingers between it and the horse’s belly. Re-check it after walking a few steps, as horses often “let out air.”
- Stirrup Leathers: Ensure they are even and securely buckled. Run the stirrups up the leathers if you’re leading your horse to the mounting area.
- Bridle Connection: Verify the throatlatch is loose enough to fit your fist sideways. Check that the bit is sitting comfortably in the horse’s mouth, and the buckle on the crownpiece is secure.
- Final Walk-Around: Walk to the right side. Confirm the girth is still fastened in its billets and the off-side stirrup leather is hanging correctly.
Setting the Stage: Approaching and Preparing Your Horse
Reading Horse Body Language for Calmness
Horses talk with their whole body. A relaxed horse is a safe horse to approach and mount. Look for a soft eye, ears flicking gently forward or to the side, and a hind leg resting. A horse that is dozing with a lowered head and slack lower lip is usually in a perfect, teachable state of mind. These cues also help you tell if your horse is happy. Understanding their body language lets you respond in ways that build trust.
I learned this deeply with Luna, my sensitive Thoroughbred. On days she was tense, her head would be high, her nostrils flared, and her muscles felt like coiled springs under my hand. Trying to mount then was an invitation for a spin or a spook. On her calm days, she’d sigh and turn her head slightly towards me as I adjusted the girth. That was my green light. Rusty, the quarter horse, is often a steady-eddy, but even he tells me when he’s grumpy-a pinned ear when I lift the saddle pad speaks volumes. Always ask permission with your eyes before you proceed with your hands.
Secure Footing and Handler Role
Never attempt to mount on a slope, mud, or loose gravel. You need a solid, level base. The quiet thud of hooves on firm, level ground is the sound of safety for both you and the horse during mounting.
For your first dozen mounts, have an experienced handler hold your horse. Their job isn’t to haul the horse into position, but to stand at its head, holding the reins loosely, providing a steady presence. They keep the horse square and still, allowing you to focus entirely on your own balance and movement. This simple step builds confidence faster than anything else. Once you and the horse are a proven team, you can graduate to mounting solo, but that helper is gold when you’re starting out.
Mounting Made Easy: Three Safe Methods

Using a Mounting Block: The Kindest Choice
I reach for my mounting block every single time, for every horse. It’s not just a convenience for my middle-aged knees; it’s a core act of consideration for the horse’s spine. Think of it like this: when you haul yourself up from the ground, you create a twisting, hanging weight on one side of the horse. Using a block lets you step across more levelly, minimizing torque on their back and the strain on the girth area. Your horse will thank you for it, especially over thousands of mounts.
Positioning is everything. Lead your horse so the mounting block is by their left shoulder. Stand on the block and gather your reins, just as if you were mounting. The horse should stand parallel to the block. If they swing their hindquarters away, calmly step off, reposition them, and try again. Patience here sets the tone for the whole ride. With my sensitive Luna, I often just rest my hand on the saddle and wait a breath until she settles before I even think about swinging a leg over.
Traditional Ground Mounting Step-by-Step
There will be times you don’t have a block. Here’s how to mount from the ground with minimal fuss.
- Stand at your horse’s left shoulder, facing their rear. Hold both reins and a bit of mane in your left hand for stability, keeping contact soft but present.
- With your right hand, turn your left stirrup leather toward you. Place your left foot securely in the stirrup, aiming the ball of your foot on the iron.
- Bounce lightly on your right foot once or twice, then push up and swing your right leg smoothly over the horse’s back. Avoid digging your toe into their side as you swing over-aim for a wide, clean arc.
- Lower yourself gently into the saddle, catching your right stirrup on the way down. Take a moment to organize your reins before asking the horse to move off.
What to Do If Your Horse Moves
A fidgety horse can turn mounting into a dance. If Pipin decides to walk off as you’re halfway up, the worst thing you can do is cling on and hop beside him. Immediately abort the mission: lower yourself back down, regain your footing, and calmly reposition him. Your calm repetition teaches them that standing still is the only option that leads to a relaxing ride.
If they sidestep, lead them in a small circle back to the exact spot. Check for discomfort-is the girth too tight suddenly? Is a fly bothering them? Address it, then try again. Your breath is your best tool; a long, slow exhale from you can trigger a relaxation response in your horse. I’ve talked many a nervous young horse through this moment with nothing but a steady voice and a patient hand.
Finding Your Seat: Basic Posture and Balance
The Foundation: Relaxed Breathing and Spine Alignment
You’re in the saddle. Now, forget about riding for a second. Just sit. Feel the horse’s barrel expand and contract beneath your legs with each of their breaths. Try to match it. Good riding starts from the belly button up, with a spine that is tall but supple, like a stack of gently aligned coins. Imagine a soft thread pulling the crown of your head toward the sky.
Avoid the two common pitfalls: the stiff, arched-back “parade soldier” or the slumped “couch potato.” Your shoulders should be back and down, your chest open. This alignment lets you absorb the horse’s movement through your core, not your spine. When Rusty spooks at a puddle, it’s this deep, anchored seat that keeps me from grabbing his mouth in panic.
Leg Position and Stirrup Length
Your legs are your primary communication system and your stability anchors. Let them hang long and relaxed from your hip. You shouldn’t feel like you’re gripping. A good check: have someone pull your stirrups off your feet while you’re sitting. Your leg position shouldn’t change drastically.
To find a basic stirrup length, let your legs hang loose and have someone adjust the leather so the bottom of the iron hits your ankle bone. When your feet are in the stirrups, you should be able to slide your hand flat between your seat and the saddle behind your thigh. Your heel should be the lowest point, but don’t force it down-think of pressing your weight into your heel, not jamming it down.
Hand Position and a Soft Grip on the Reins
Hold your hands in front of you, as if you’re gently carrying a cup of hot coffee in each, thumbs on top. Your fists should be upright, wrists straight, and a straight line should run from your elbow down the rein to the bit. This is the “bridge.”
The connection should feel alive, not fixed. You’re holding a conversation, not pinning their head in place. After you give a cue with the reins, the most important thing you can do is soften, giving that release of pressure that tells the horse, “Yes, that’s what I wanted.” Hard, static hands create anxious, heavy horses. I keep my fingers soft, often imagining I’m holding baby birds-firm enough so they don’t fly away, but gentle enough not to hurt them.
Your First Controls: How to Walk, Steer, and Stop
Asking for Walk: Leg and Seat Aids
Think of asking for walk as a polite conversation, not a shout. You’ll use your legs, seat, and voice together. First, ensure you’re sitting balanced, not leaning forward. Take a deep breath and relax your hips. Squeeze gently with both calves, as if you’re giving the horse a quiet nudge with your lower legs, and pair it with a clear, soft cluck or a calm “walk on.” Release the pressure the instant you feel the horse begin to move. I learned this on Luna; with her sensitive nature, a heavy leg just makes her tense up. A light, clear ask gets the best response.
Basic Steering with Direct Rein Pressure
To steer, you’ll use what’s called a direct rein. Look where you want to go, then gently draw your hand back toward your hip on that same side. To turn left, apply light, steady pressure on the left rein. To turn right, do the same on the right. Your other hand should maintain a soft, following contact to keep the horse straight, not sawing back and forth like car steering wheel. This is different from neck reining, where you lay the rein against the neck-a skill for later once you’re comfortable. For now, direct reins are your clear, simple language. Later, you’ll move into lead steer your horse—learning how your body and reins cue him to follow your direction. This natural next step links direct rein technique to broader, confident steering from the saddle.
The All-Important Stop: Using Your Seat and Reins
Stopping is about your body first, your hands last. Sit down deep into your saddle, as if you’re suddenly heavier. Say “whoa” in a low, steady voice. Then, apply even, gentle pressure on both reins by closing your fingers. The cue is a deepening of your seat and a quiet voice, followed by steady hands that say “slow down,” not a sharp pull that says “panic.” Rusty, my trail horse, will stop off a voice command alone if I sit deep, proving how powerful your seat is. Yanking teaches a horse to brace against the bit, which is the opposite of what you want.
Building Confidence: Simple On-Ground and Riding Exercises
Pre-Ride Bonding: Grooming and Leading
Your ride truly begins on the ground. Spending ten minutes grooming isn’t just about removing dirt; it’s a massage and a trust check. Run your hands over their coat, feeling for heat or tightness. This quiet time lets your horse see you as a partner, not just a passenger, and it settles both your nerves. That mindful touch can deepen your connection with your horse. Many riders find grooming a bridge to trust and communication. I always do this with Pipin, our Shetland pony. His cheeky attitude melts when he gets a good curry comb session, making him far more focused and willing when I finally pick up the lead rope.
Balance Drills at the Walk
Balance is a feeling you build. At a safe, steady walk, try these drills to find your center without gripping with your knees.
- Two-Point Position: Rise slightly out of the saddle, hinging at your hips, and hold for five strides. This strengthens your legs and lightens your seat.
- Arm Swings: Slowly swing your arms forward and back, then out to the sides. If you wobble, you know where your balance is off.
- Around the World: Carefully lift one hand and point to your horse’s tail, then the opposite ear. This teaches independent seat and hand control.
The creak of leather and the thud of hooves become your rhythm track. Do these on a reliable horse like Rusty before trying them on a more sensitive mount.
Practicing Transitions: Walk to Halt and Back
Smooth transitions are the hallmark of a rider starting to listen to their horse. Pick a straight line along the rail. Walk five strides, then ask for a halt using your seat and voice. Stand for a three-count, then ask for a walk again. The goal is a seamless flow, where the horse responds to a whisper of aid, not a shout. When you get a good response, instantly reward by relaxing the reins and giving a verbal “good boy.” This drill makes your cues clearer and builds mutual understanding, one step at a time. These refinements bridge to teaching your horse basic ground manners—leading, halting, and respecting space. Mastering them on the ground will make your mounted work smoother and safer.
Riding Safely: Reading Your Horse and Your Environment

Good riding isn’t just about your position. It’s a conversation. Your horse is talking to you constantly through his body language. Learning to listen is your number one safety tool. The quiet thud of hooves on the trail is a lovely sound, but the shift in your horse’s muscles beneath you speaks volumes. I’ve learned more from the set of Luna’s ears or the tension in Rusty’s jaw than from any instruction manual. Talk to your horse and understand the signals they give. When you do, you build better communication.
Spotting Early Signs of Tension or Distraction
Horses don’t yell. They whisper. Missing these whispers can lead to louder problems. Watch for these subtle shifts before they become big reactions.
A happy, relaxed horse has a soft eye, a swinging walk, and ears that flick gently toward sounds or your voice. Tension starts small. Here’s what to watch for: The Understanding Horse Behavior Psychology Complete Guide explains why these signals appear and how to respond with calm, effective handling.
- Ears: Pinned flat back is a clear “back off.” Ears rigidly pointed forward, locked on a distant object, mean he’s hyper-focused and may spook.
- Head and Neck: A sudden high head carriage, head tossing, or a stiff neck that resists gentle rein contact.
- Tail: Violent swishing (not the casual fly-swatting) or clenching.
- Body: A hollowed back, stiff stride, or sudden hesitation. You might feel his back tighten up under the saddle.
- Breathing: Snorting can be normal, but held breath or loud, rapid exhales signal stress.
When you see these signs, your job is to de-escalate, not to confront. Don’t pull harder or kick. Instead, take a deep breath yourself-your horse will feel it. Slow down or halt. Give him a long, loose rein to lower his head, which can help him think. Talk to him in a calm, low voice. Sometimes, just turning him in a small, quiet circle can break his fixation on a scary bush.
Managing Common Beginner Anxieties
Feeling nervous is normal. Every single rider has been there, including me on my first solo trot on Rusty. Your horse can feel a butterfly landing on his back, so he certainly feels your tension. The key is managing your own reactions to keep both of you safe.
A huge fear is the horse taking off or speeding up unexpectedly. If your walk feels too brisk or you feel a jog coming, don’t panic and yank the reins. A steady, seated “whoa” paired with a firm (not jerky) pull-and-release on the reins is far more effective than a terrified tug-of-war. Sit deep, breathe out, and focus on a point in the distance.
If anxiety is rising and you’re no longer having fun, it’s perfectly okay to stop. There is zero shame in a strategic dismount. It’s a sign of mature horsemanship, not failure. Understanding common horse fears and skittish behavior helps you read anxiety cues. This knowledge guides calmer, safer handling. Tell your horse “whoa,” ask a helper to hold him if possible, and calmly get off. End on a good note by giving him a pat and walking him calmly back to the barn. You’ll both be more confident next time.
For in-the-saddle nerves, try this: focus on your own body. Count your breaths. Relax your death-grip on the reins. Shake out one hand at a time. Sing a silly song under your breath. This redirects your brain from “what if” to “what is.” I still hum old tunes to myself when schooling a fresh horse on a windy day-it works for both of us.
Frequently Asked Questions: How to Mount and Ride a Horse for Beginners
Are there horse riding basics books recommended for beginners?
Yes, books like “The Complete Guide to Horse Care” or “Riding for Beginners” offer detailed explanations on tack, posture, and safety. They complement hands-on learning by providing diagrams and step-by-step instructions for mounting and balance. Look for titles with clear visuals and positive reviews to build your foundational knowledge effectively, especially when handling horses safely as a beginner.
Can YouTube videos help with learning horse riding basics?
Absolutely, channels such as “Your Riding Success” or “Equestrian Coach” feature tutorials on mounting, steering, and confidence-building exercises. These videos are great for visual learners to see techniques in action, like proper leg position or rein handling. Always pair online learning with supervised practice to ensure safety and correct application.
What should beginners know about western riding basics?
Western riding uses a saddle with a horn and longer stirrups, encouraging a relaxed, deep seat compared to English style. Beginners often start with neck reining, where cues are given with one hand, rather than direct rein pressure. Focus on slow, steady movements and finding balance in the saddle, as western horses are trained for smooth transitions and comfort on trails. Deciding which discipline fits your horse often comes down to temperament and riding goals. A quick comparison of Western and English styles can help you choose which suits your horse best.
Your First Steps Together
Focus on your calm, deliberate groundwork and double-check your girth before you ever put a foot in the stirrup. A proper mount begins long before you swing your leg over, rooted in the quiet confidence you build standing at your horse’s shoulder.
Be patient with yourself and your horse, celebrating the small, steady wins. The best ride is built on mutual trust, and that starts by listening to the soft snort or the quiet sigh as much as any command you give.
Further Reading & Sources
- A Beginner’s Guide to Horseback Riding
- r/Equestrian on Reddit: Learning horse riding with no experience
- Horse Riding Tips For Beginners | Northern CA Dude Ranch
- How to Ride a Horse English & Western Style for Beginners
At Horse and Hay, we are passionate about providing expert guidance on all aspects of horse care, from nutrition to wellness. Our team of equine specialists and veterinarians offer trusted advice on the best foods, supplements, and practices to keep your horse healthy and thriving. Whether you're a seasoned rider or new to equine care, we provide valuable insights into feeding, grooming, and overall well-being to ensure your horse lives its happiest, healthiest life.
Equipment