How to Put a Harness on a Horse: A Safe, Step-by-Step Guide
Hello fellow equestrians! Getting that harness on correctly can be a real head-scratcher, and a misstep might mean a pinched horse or a frustrating battle of wills.
Today, I’ll walk you through the entire process, from untangling the leather to that final satisfying click. You’ll learn the foolproof order for buckling to avoid twisted straps, how to check every critical point for fit and comfort, and my favorite calming techniques for horses who are skeptical of the whole affair.
My advice comes from long days in the aisle, harnessing everything from my food-motivated pony Pipin to my sensitive mare Luna, ensuring their welfare and comfort is always the priority.
Understanding Your Tack: Harness Types and Parts
Think of a harness as a horse’s work uniform-the right fit and style matter for the job. I’ve fumbled with everything from light driving rigs on Luna to heavier setups for farm work. Knowing your harness types prevents mismatched gear that can rub, pinch, or scare your horse. The two main categories you’ll encounter are driving and draft harnesses.
- Driving Harness: Designed for pulling carts or carriages. It’s generally lighter, with thinner straps to allow for freer movement. This is what I use with Rusty for trail drives.
- Draft Harness: Built for power. Used by draft horses for pulling heavy loads like logs or plows, it features more padding, wider straps, and often a collar instead of a breastcollar.
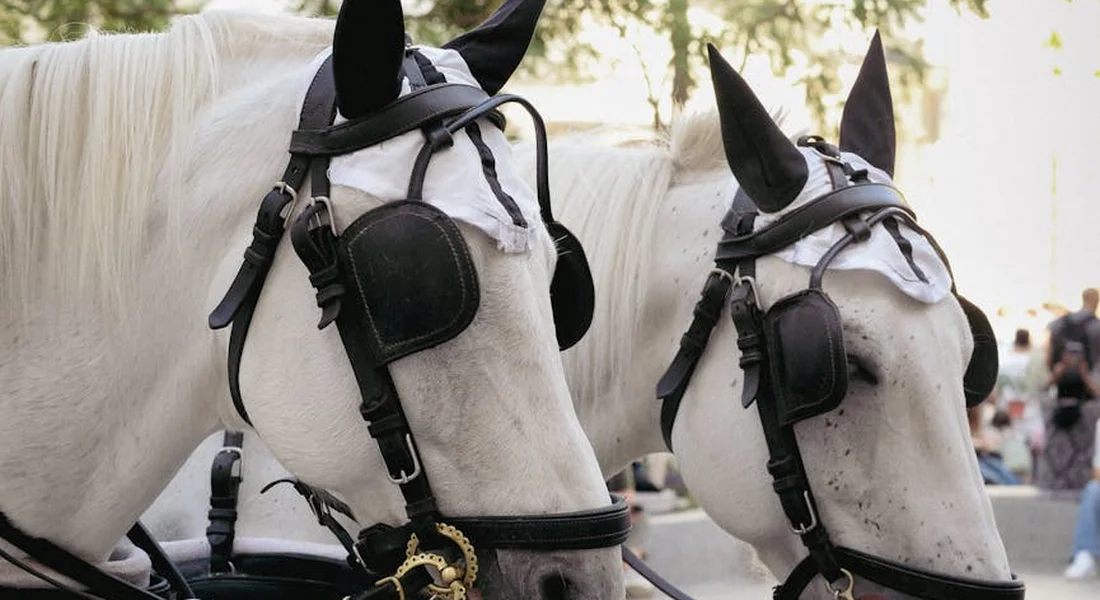
Every harness is a puzzle of leather, nylon, and metal. Let’s break down the key pieces you need to identify before you even touch your horse.
| Part Name | What It Does | Quick Fit Tip |
|---|---|---|
| Headstall | This is the bridle portion that holds the bit in the horse’s mouth. It includes cheekpieces and a browband. | You should fit two fingers between the browband and your horse’s temple to avoid pressure. |
| Breastcollar | A wide strap that sits across the chest. It’s the primary point where the horse pushes into the load. | It must sit low on the breastbone, never high on the neck where it can restrict breathing. |
| Traces | Long straps or chains that run from the harness back to the vehicle or implement being pulled. | They must be of equal length to ensure balanced pull and prevent twisting. |
| Girth (or Bellyband) | Secures the harness around the horse’s barrel, similar to a saddle girth. It keeps everything from sliding back. | Fasten it snugly, but you should still slide your flat hand underneath it easily. |
| Reins | Long lines that connect from the bit to the driver’s hands for steering and stopping. | They should have a consistent, gentle drape without drooping on the ground where a horse could step on them. |
Laying all the parts out in the aisle, smelling the leather, is the best way to learn. Run your hands over every inch, feeling for stiff spots or cracks that tell a story of past use.
Preparation is Key: Getting Your Horse and Gear Ready
Rushing this step is how accidents happen. I learned this the hard way with a spooky Luna years ago. Your first task is to prepare the mind of the horse, not just the body. Start in a familiar, enclosed space like a round pen or quiet stall aisle, especially when you’re just learning.
Spend ten minutes on simple groundwork. Ask your horse to yield its hindquarters, back up a few steps, and stand quietly while you rub the lead rope over its back and legs. This establishes you as a calm leader and desensitizes them to the feel of straps. With a clever pony like Pipin, I make it a game of patience and treats for standing still.
Next, give your harness a thorough safety inspection. Do this every single time, without fail.
- Examine all leather for dry rot, cracks, or deep scratches.
- Check every buckle, rivet, and stitch point for weakness or corrosion.
- Run the straps through your hands to feel for hidden breaks or thinning.
- Ensure all keepers and loops are intact and not twisted.
A quiet environment is non-negotiable. Turn off the radio, ask barn mates to pause their chores, and breathe deeply yourself. Your horse will mirror your energy, so a patient, slow approach prevents a dance of frustration.
Start With a Halter and Lead
For your first several practice sessions, do not use the bridle portion of the harness. Always put the harness on over a well-fitting halter, with a lead rope attached for control. This lets you introduce the feel of the breastcollar and girth without the complication of a bit. You can clip the lead to a tie ring or have a helper hold it, giving you safe, instant control if your horse shuffles or startles. It’s the stable hack that builds confidence for both of you.
The Golden Rule: How a Harness Should Fit
Think of a harness fit like your horse’s favorite blanket: it should stay put without any tight spots or sagging. A harness that rubs or restricts will sour your horse to work faster than a bucket of spilled grain, so taking time to get it right is non-negotiable.
Aligning the Anchor Points: Breastcollar, Girth, and Bridle
Each part of the harness has a specific job, and its placement directly affects comfort and pulling power. I check these three points on every horse, from steady Rusty to spooky Luna.
- Breastcollar: This must sit flat on the chest, a hand’s width below the shoulder point. It should not slide down into the armpits when the horse moves forward. On a broad-chested horse like Rusty, I often need a wider collar to prevent pinching.
- Girth: The belly band should lie snugly behind the elbows, not on them. You should be able to slide your entire flat hand between the girth and the horse’s barrel after tightening. An overly tight girth is a common source of girthiness and resentment, so when in doubt, go a hole looser and monitor.
- Bridle/Headstall: The bit should create one or two slight wrinkles at the lip corner, not a deep furrow. The throatlatch must allow for a full jaw swing-easy to forget until you hear the frustrated head toss.
The Finger-Width Rules for Buckle Adjustment
Your fingers are the best measuring tools you have. Use them to prevent raw spots and pressure sores. For the breastcollar and any strap crossing a bony area, you must fit two stacked fingers between the leather and your horse’s skin. For the girth, use the full-hand rule. On fuzzy ponies like Pipin in winter, I allow an extra half-finger of space to account for coat compression.
Step-by-Step: Putting the Harness on Your Horse
Harnessing is a ritual, not a race. I always start with a calm brush-down and a quiet word to set the tone. This methodical order prevents tangles and keeps the horse at ease.
The Sequential Harnessing Process
- Begin with the Bridle and Bit. Approach from the left side, as you usually would. Slip the headstall over the ears and guide the bit into the mouth gently. Secure the throatlatch and noseband, checking your finger-width gaps. A patient approach here saves time later.
- Drape and Buckle the Breastcollar. Place it over the neck first to keep it from dragging. Then fasten it around the chest, ensuring it’s centered and straight. I always walk Rusty forward a step to see if it settles correctly.
- Position the Back Pad or Saddle. Set it lightly over the withers, ensuring it doesn’t press forward onto the shoulder blades. Let it rest for a moment before attaching any other straps.
- Secure the Girth. Connect the girth on the right side first, then return to the left to adjust. Tighten it slowly, in stages, just like you would with a riding saddle. Always stand to the side, not directly in front of the hindquarters, when reaching for the girth to avoid a defensive kick.
- Attach the Traces Last. Hook the trace chains or leathers to the singletree or vehicle. Check for even length by sighting down them. Any twist in the trace can create dangerous imbalance.
Safe Leg Handling for Girth and Trace Adjustment
Straps sometimes fall near legs. Never grab a leg suddenly. If a strap is under a hoof, apply steady upward pressure on the cannon bone while speaking softly; most horses will lift the foot for you willingly. For trace adjustment, run your hand down the leg to move it slightly forward or back, always following the natural direction of movement. With a high-strung horse like Luna, I make all my adjustments from the side, keeping my body out of her direct kick zone. Proper adjustments become much more comfortable after you saddle the horse properly.
Connecting to Work: Attaching the Harness to a Cart

With the harness on, the real partnership begins. Aligning the cart safely is your first priority. Position the vehicle squarely behind your horse, making sure the shafts are parallel and the ground is level. I always walk Rusty up to the cart calmly, letting him sniff the shafts-the familiar clink of metal seems to reassure him this isn’t a monster. Your horse should be standing quietly, not fidgeting or looking tense, before you proceed.
Follow this order to connect everything smoothly and safely:
- Hook the traces to the singletree first. Connect the trace chains or leathers from the harness to the swingletree on the cart. Ensure they are of equal length and hang straight without any twists. That even drape is crucial for balanced pull.
- Then, thread and attach the reins. Run the reins through the terrets (the little rings on the harness) and fasten them to the bit. Leave them slack on the ground or draped over the cart for now-you never want to have connected reins before you’re fully ready to drive.
- Verify the breeching and holdback straps. These are what help the horse slow and hold the cart on a hill. They should sit comfortably against the hindquarters, with enough space for a flat hand to slide between strap and horse.
Your final safety check is non-negotiable. Walk a full circle around the entire outfit, your eyes scanning for folded leather, a trapped tail, or a buckle about to give way. Place your hand on the horse’s withers and feel for calm; listen for the steady rhythm of their breathing. Give one last gentle tug on every critical connection point-collar, hames, traces-before you pick up the reins. Knowing your horse and your own safety go hand in hand.
Pitfalls to Avoid: Common Harnessing Mistakes
Most harnessing errors come from haste or distraction. Spotting them early prevents discomfort and danger. I keep a mental checklist from years of fixing my own blunders with everything from a steady Quarter Horse to a clever Shetland pony.
- Twisted Straps or Lines: A single twisted strap concentrates pressure, leading to painful rubs and galls. Run your palms down every inch of leather, from the collar over the shoulders to the breeching behind, feeling for smooth, flat alignment. I once missed a twisted rein on Luna, and her sensitive nature meant she spent the whole drive trying to tell me something was wrong.
- Improper Tightness: The “two-finger rule” is a classic for a reason. Straps that are too tight inhibit movement and breath; too loose, and they slide, causing sores or failing in their job. Adjust for the horse’s posture-a belly band that’s perfect at a standstill might become tight when the horse lowers its head to pull. Check fit again after a few minutes of walking.
- Rushing the Horse: Hurrying the process stresses the animal and makes you prone to oversights. Build in quiet time for patience, watching for soft eyes and a lowered head as signs your horse is mentally ready, not just physically restrained. Pipin, our escape artist, has taught me that rushing only makes him cleverer at evading the next step.
- Ignoring the Horse’s Feedback: A pinned ear, a swishing tail, or a resistant step is a report card on your harnessing job. Avoid the temptation to dismiss these signs as stubbornness; they are often the first clue that a strap is pinching or a buckle is cold against their skin. Gentle horsemanship means listening with your eyes and hands.
Keeping It Serviceable: Harness Care and Maintenance

A clean, well-maintained harness is a safety contract between you and your horse. That old leather smell might seem nostalgic, but neglect is a quiet promise to fail. I’ve pulled harnesses out of storage that crumbled in my hands, a sobering reminder that our gear only lasts if we listen to it.
The Daily Wipe-Down: A Five-Minute Ritual
After every use, before you hang it up, give it a quick once-over. This isn’t a deep clean, but it prevents sweat and grime from setting in and degrading the fibers. This simple habit dramatically extends the working life of every strap and buckle.
- Use a slightly damp, clean cloth to wipe down all leather and synthetic surfaces, removing sweat and dirt.
- For leather, follow with a dry cloth. Never put away wet leather; it will mildew and rot.
- Run your fingers along the stitching on critical points like the tugs and breeching to feel for any grit or embedded debris.
- Check all buckles and snaps for free movement. A drop of oil on a sticky buckle can save a panic later.
- Hang it properly on a broad, shaped harness rack-never on a nail or a narrow hook that will distort the collar.
Smart Storage for Longevity
Where you store your harness is as important as how you clean it. A damp, dusty tack room is a death sentence. I keep mine in a climate-controlled space, and it’s made all the difference.
- Always store on a proper harness rack. This maintains the shape of the collar and prevents straps from developing permanent, weak kinks.
- Keep it in a dry, ventilated area away from direct sunlight, which bleaches and dries out leather.
- Use a breathable canvas cover to protect from dust, not a plastic one that traps moisture.
- For long-term storage, apply a quality leather conditioner, but not a heavy oil that can attract dust and soften leather too much.
The Critical Inspection: Looking for the Whispered Warnings
Once a week, or before any major outing, conduct a thorough inspection. This is where you play detective. Your goal is to find the weak spot before it finds you in the middle of a drive.
Focus on these high-stress areas:
- Stitching: Examine every seam, especially where straps connect to the collar or hames. Look for fraying, broken threads, or stitches that are pulling loose. Rub your thumb over them; if threads pop up, it’s time for repair.
- Buckle Holes and Tongues: Leather stretches and wears. Check the first and second buckle holes on every strap for elongation or tearing. Inspect buckle tongues for sharp edges that can cut the leather.
- Friction Points: Look at where straps cross or rub, like where the breeching strap passes through the shaft tugs. Is the leather wearing thin or becoming shiny and brittle?
- Hardware: Check all snaps, buckles, and Dee-rings for cracks, rust, or deformation. A bent Dee-ring can snap under pressure.
- The Collar: Feel the entire interior for lumps or hard spots that could cause a gall. Ensure the hames sit perfectly flush with no rocking.
Finding a worn strap isn’t a failure-it’s a success. It means your system is working. I found a nearly-frayed-through tug on old Pipin’s harness during a routine check; catching it in the barn saved us a world of trouble on the road. That’s the whole point. Your care is the quiet, daily insurance policy for every peaceful drive you take.
Frequently Asked Questions About Putting a Harness on a Horse
What safety checks should I perform on the harness itself before using it?
Before every use, thoroughly inspect all leather for cracks, dryness, or significant wear. Check every buckle, rivet, and stitching point for weakness, corrosion, or fraying. Finally, run all straps through your hands to feel for hidden breaks and ensure no keepers or loops are twisted or damaged.
What is the correct order for attaching a harness to a cart?
Always connect the traces to the vehicle’s singletree first to ensure an even, balanced pull. Next, correctly thread and attach the reins to the bit, but leave them slack until you are ready to drive. Finally, verify the breeching and holdback straps are fitted properly to allow the horse to slow and hold the cart. For safety, consult a safe, step-by-step guide to tying a horse for reference. Having that guide handy helps ensure a calm, secure tie before you proceed.
How should I clean and store my harness after use?
After each use, wipe down all leather and synthetic surfaces with a slightly damp cloth to remove sweat and dirt, followed by a dry cloth for leather. Always hang the harness on a broad, shaped rack in a dry, ventilated area away from direct sunlight. For long-term storage, condition the leather and use a breathable cover to protect it from dust without trapping moisture.
Harnessing with Care and Confidence
Introduce each piece slowly and check the fit of every strap before you fasten the next. Take a moment to ensure the tack is properly fitted and adjusted before moving on. Always finish with a thorough inspection, running your hands under all leather to confirm it’s snug without pinching and allows your horse to move their shoulders and chest freely.
This process is a dialogue, so let your horse’s breathing and body language guide your pace. A comfortable horse who stands quietly is giving you the best feedback you can get.
Further Reading & Sources
- How to Harness a Horse: 15 Steps (with Pictures) – wikiHow
- Horse harness – Wikipedia
- How to Fit Driving Harness – Chimacum Tack
- r/Horses on Reddit: Help describing this horse harness and set-up
At Horse and Hay, we are passionate about providing expert guidance on all aspects of horse care, from nutrition to wellness. Our team of equine specialists and veterinarians offer trusted advice on the best foods, supplements, and practices to keep your horse healthy and thriving. Whether you're a seasoned rider or new to equine care, we provide valuable insights into feeding, grooming, and overall well-being to ensure your horse lives its happiest, healthiest life.
Equipment