How to Prepare Your Land for Keeping Horses (A Checklist)
Published on: March 4, 2026 | Last Updated: March 4, 2026
Written By: Henry Wellington
Hello fellow equestrians! That excitement of finally having space for your own horses is often quickly shadowed by the sheer number of questions about where to even begin. I know the worry-imagining a loose horse on the road or a vet bill from a fence-related injury can turn dreamy plans into stressful puzzles.
In this guide, I’ll walk you through the key steps to transform your property into a safe, healthy haven. We’ll cover:
- Assessing your soil and drainage to prevent harmful mud and encourage good grass.
- Choosing and installing horse-safe fencing that contains even clever escape artists like my pony Pipin.
- Planning adequate shelter and turnout space because equine welfare is built on freedom and protection from the elements.
- Ensuring a reliable, clean water supply that works in all seasons.
- Setting up a managed grazing system to keep your pasture nutritious and prevent overgrazing.
My advice comes from multiple years of barn management and horse training, where I’ve prepared everything from rocky plots to muddy fields for sensitive souls like Luna and steady eds like Rusty.
Start with the Paperwork: Zoning and Legal Essentials
Research Local Zoning and Permits
Before you bring home a single bale of hay, you need to know what your land is legally designated for. I learned this the hard way years ago when I assumed my rural five acres was automatically “agricultural.” It was zoned residential, and keeping livestock required a special use permit.
Common zoning designations you’ll look for include Agricultural (A), Rural Residential (RR), or Estate (E). Your county or township planning office can tell you your property’s zoning and what’s permitted.
- Contact your local county planning, zoning, or building department. A phone call or website visit is your first step.
- Ask specifically about permits for “hobby livestock,” “equine keeping,” or “agricultural accessory structures” like run-in sheds.
- If you have a Homeowners’ Association (HOA), review its covenants. Many prohibit livestock entirely, no matter the county rules.
Do not skip the conversation about insurance. You must increase your liability coverage and ensure your property policy covers structures like barns and fences; a standard homeowner’s policy often will not.
Understand Basic Horse Keeping Laws
Zoning gets you permission to have horses. Local ordinances dictate how you must keep them. These rules are often about being a good neighbor and protecting the environment. However, they can make it tricky to keep a horse in your backyard.
The most frequent regulations involve manure management and property lines. Many areas require manure piles or compost sites to be a minimum distance from property lines or waterways.
- Manure setback distances can range from 50 to 200 feet from neighboring dwellings or wells.
- Animal density rules, often called “animal unit” codes, limit how many animals you can have per acre.
- Water rights are critical. If you plan to use a well or natural stream, verify you are legally allowed to do so and if there are any usage restrictions, especially in drought-prone areas.
Ignoring these laws can result in fines and neighborly disputes that sour the joy of keeping horses at home. A proactive visit to your local health or environmental services department can save immense headache later.
Evaluate Your Property’s Foundation and Risks
Conduct a Thorough Land Assessment
The best barns are built from the ground up-literally. Your soil is the foundation of everything. Spend time walking your land after a heavy rain. This tells you more than any map ever could.
You’re looking for where water pools and how it moves. A low, soggy area might become a boggy, parasite-laden mess in winter. A sloping hillside without grass cover will erode quickly under hoof traffic.
- Get a professional soil test from your local agricultural extension office. It reveals pH and nutrient levels, guiding your pasture management plan from day one.
- Identify natural drainage ditches and low spots. Plan fences and buildings around them, not through them.
- Walk your fence lines and pasture looking for toxic plants like ragwort, oleander, or certain types of maple. Plan for their safe removal before your horse ever sets foot on the grass.
Good land management starts with understanding what you’re working with; you cannot fix a drainage problem you refuse to see. I’ve spent many a muddy spring redirecting water flow because I didn’t assess this properly on my first property.
Analyze Existing Infrastructure
Now, look at what’s already there with a horse’s critical eye. That charming old shed? Will it work as a shelter? That single faucet by the house? Is it enough for filling troughs 100 feet away?
Water is your most critical resource. A reliable, clean supply is non-negotiable. Check the flow rate from your well or spigots. Hauling water in buckets gets old fast.
- Test your water pressure and volume by timing how long it takes to fill a 100-gallon trough. Is it practical for daily use?
- Map out where you have electrical access. You’ll need it for fencing, lights, and perhaps a water heater in winter.
- Evaluate any existing structures for safety. Look for rotten wood, exposed nails, and low roofs. A stable layout should allow for easy movement of horses and equipment.
- If you need a run-in shed, identify a high, well-drained spot with the opening away from prevailing winds.
Your horse’s safety and your own convenience hinge on placing water, shelter, and storage in a logical, accessible triangle. Trust me, you don’t want to be lugging hay bales an extra hundred yards in the dark because you didn’t think it through.
Build Safe and Secure Fencing
Choose the Right Fence Type
Your fence is more than a boundary; it’s a silent guardian that keeps your horse safe and sound. I learned this lesson watching Pipin, our Shetland pony, test every rail and post until he found a weak spot-twice before breakfast. Choosing the right material balances durability with your horse’s personality and your budget.
Compare these common options by their pros and cons for real-world use.
- Wooden Fencing: The classic choice, wooden rails are sturdy and highly visible. Pros: They withstand playful nudges from a calm soul like Rusty and cause less severe injury on impact. Cons: They demand yearly maintenance to prevent rot and splinters, which can be a hassle in wet climates.
- Electric Fencing: This is a brilliant teacher for respect, especially for a sensitive Thoroughbred like Luna. Pros: It’s affordable, flexible for dividing pastures, and delivers a safe, memorable shock. Cons: It requires diligent checking for breaks, and the thin wire can be hard for horses to see. Always pair electric lines with wide, brightly colored tape to give your horse a clear visual warning.
- Vinyl Fencing: A low-maintenance modern option, vinyl won’t splinter or need painting. Pros: It’s durable, easy to clean with a hose, and has a smooth surface. Cons: The initial cost is higher, and in extreme cold, it can become brittle and crack.
Material is just the start. Prioritize safety features like a minimum height of 4.5 feet to deter jumping and high visibility to prevent spooky run-ins. Gates need horse-proof, double-latching mechanisms-because if there’s a way out, a curious pony will find it.
Installation and Maintenance Planning
A well-installed fence is a lasting investment, and skipping steps now leads to repairs later. Start by walking your pasture to plan the layout, noting any dips where water might pool and weaken your line. This foresight saves you from muddy nightmares during spring thaw.
Follow these steps for a solid build:
- Mark your fence line with stakes and string, ensuring corners are braced at 90-degree angles for maximum strength.
- Dig post holes deep, about one-third the post height, and set them in concrete for a foundation that won’t wobble. I spend extra time here with a level; a leaning post is an invitation for trouble.
- Attach rails or wires with even tension, checking for any protruding nails or sharp edges that could snag a coat.
- Hang gates so they swing freely and latch securely, testing the mechanism yourself before your horse does.
Your job isn’t done after installation. Inspect your entire fence line at least once a week for loose boards, sagging wires, or signs of chewing or rubbing. For run-off control, grade the soil along the fence to slope gently away, and consider adding a gravel apron to prevent erosion and muddy hooves from undermining your posts.
Provide Essential Shelter and Water
Design Effective Shelter
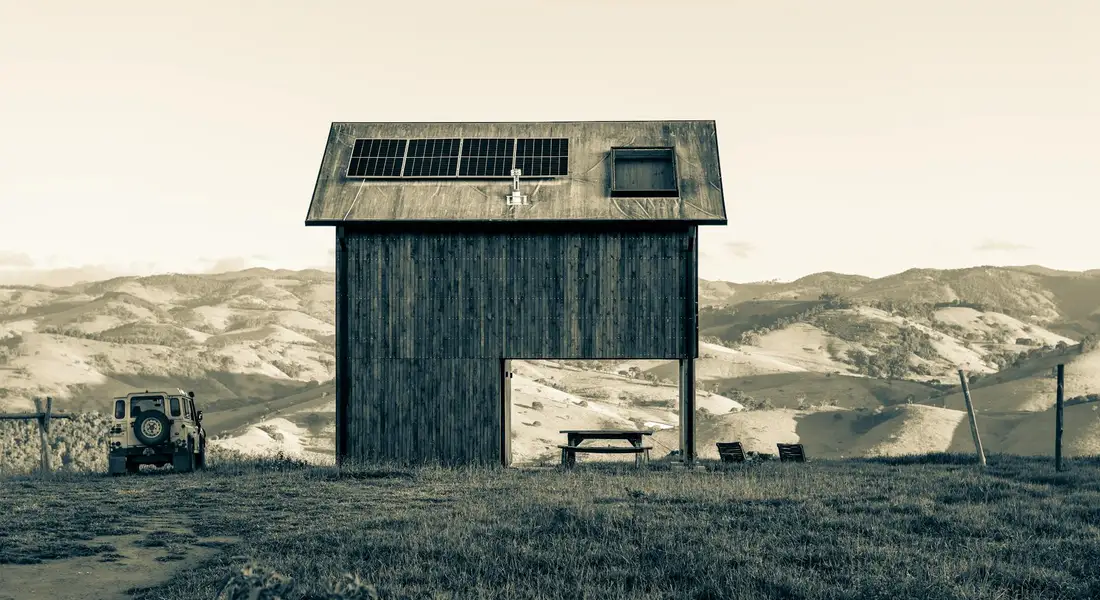
Shelter isn’t just a roof; it’s a retreat from summer sun and winter wind that lets your horse choose comfort. I advocate for run-in sheds over closed stalls because they encourage constant turnout and natural movement, which is vital for mental and physical health. So, you might wonder: does your horse need a run shed? Consider your pasture, climate, and turnout goals to decide.
Here are your main options for effective shelter:
- Three-sided run-in sheds: These are my go-to for most pastures. Place the open side away from prevailing winds and rain. Size it generously-at least 12 feet by 12 feet per horse-so even a tall, anxious mare like Luna doesn’t feel cornered.
- Portable field shelters: Ideal for rotational grazing, they can be moved with the seasons. Just anchor them down firmly; I learned after a windy day sent one skidding when it wasn’t weighted with cinder blocks.
Placement is as crucial as the structure itself. Build on high, well-drained ground to avoid creating a swampy mess, and ensure multiple entry points to reduce bullying at the doorway. Remember, natural features count too. Trees provide shade, and a thick hedgerow can break the wind, giving your horse more reasons to roam and explore.
Ensure a Reliable Water Supply
Fresh, clean water is the cornerstone of equine care, and a dehydrated horse is a horse in trouble. A horse can easily drink 10 gallons a day, and that demand doubles in hot weather or after a long trail ride with a partner like Rusty. Understanding how much water a horse needs each day helps you plan hydration. It also makes spotting dehydration early easier. Your system must be foolproof.
Evaluate these common water source types for your setup.
- Automatic waterers: They provide a constant fresh supply and reduce labor. Pros: Great for ensuring availability. Cons: They can fail mechanically or grow algae if not cleaned weekly. Check the float valve daily-a silent failure can empty a tank in hours.
- Traditional troughs: Rubber or plastic troughs are simple and reliable. Pros: You can see the water level at a glance and scrub them easily. Cons: They freeze in winter and can warm up too much in summer. Position them away from fence lines to prevent playful kicks from contaminating the water.
Maintenance is non-negotiable. Scrub troughs with a vinegar solution weekly to prevent slime. For winter, use submersible heaters designed for livestock, and always protect cords from chewing. Calculate daily needs: a 1,000-pound horse needs 5 to 10 gallons minimum. Always have a backup plan, like a spare hose or a stack of buckets, for when the power goes out or the pump fails. Your horse’s thirst won’t wait for a repairman.
Cultivate Healthy Pastures Through Management
Establish and Maintain Grazing Areas
Think of your pasture as a living salad bar for your horses. Its health starts underground. I learned this the hard way with Luna’s field; a simple soil test revealed it was as acidic as old coffee, starving the grass. Contact your local extension office for a soil test kit-it’s the single best way to know what your land actually needs before you spend a dime on seed or fertilizer. The report will tell you exactly which nutrients are missing.
Choosing grass is not a one-size-fits-all game. For my dry clay, a mix of perennial ryegrass and fescue holds up to Rusty’s steady grazing and our summer heat. In wetter areas, Timothy or orchard grass might be your winner. Select species suited to your climate, soil type, and how hard your horses will be on it-Pipin may be small, but his focused grazing can demolish a weak spot in days.
Seeding is a patience game. Prep the soil by removing rocks and old weeds, then sow after a good rain in early fall or spring. I often mix seed with a little sand to help it spread evenly from my broadcaster. Keep horses off for at least 6-8 weeks to let the tender roots establish.
Overgrazing turns salad bars into dirt lots. I use a simple rotational system: split your pasture into at least two, preferably three, paddocks. Let the horses graze one down to about 3 inches, then move them to the next. This rest period, usually 3-4 weeks, lets grass recover its energy reserves and outcompete weeds. Watching Luna dance into a fresh, rested paddock never gets old.
Mow your pastures after you rotate horses off. This chops down weeds before they seed and encourages grass to grow back thicker. Fertilize only according to your soil test results-over-fertilizing can cause laminitis. Regular mowing and targeted fertilizing build a resilient turf that can handle hoof traffic and provide consistent nutrition. To protect your horses, review the five pasture-management mistakes that can lead to laminitis and adjust practices accordingly. Being proactive about these mistakes will reduce laminitis risk.
Create a Feeding and Storage Zone
Feeding horses in the same spot they loaf or sleep is an invitation for waste and bickering. Designate a separate, well-drained area for meals. I use a simple gravel pad for my feed tubs; water drains fast, and Pipin can’t paw it into a sinkhole. A dry, organized feeding zone keeps hay off the mud and grain out of the dirt, which means every bite you pay for goes into your horse. Understanding how and where horses lie down to sleep can guide how you schedule turnout and meals. This supports calmer days and better digestion.
Store your hay and grain like you’re fortifying a castle against tiny invaders. Hay should be stacked on pallets in a dry, ventilated shed to prevent mold. Grain belongs in sealed, metal bins-plastic totes are no match for determined raccoons or mice. Invest in robust storage from the start; replacing a chewed-through bag of sweet feed or a spoiled hay bale is money literally thrown away. I keep a bag of diatomaceous earth nearby to sprinkle around storage areas; it’s a natural pest deterrent that keeps critters from settling in.
Manage Waste and Protect the Environment
Implement a Manure Management System
Manure happens-about 50 pounds per horse, per day. Managing it isn’t just tidy; it’s critical for parasite control and water quality. Set up a composting pile on a level, well-drained spot at least 100 feet from any stream or well. A proper compost pile heats up to kill parasite eggs and weed seeds, turning waste into garden gold. I layer fresh manure with old, dry straw or leaves to balance the nitrogen and carbon. When fully composted, horse manure makes a ready-to-use garden fertilizer.
Your pile should be at least 3 feet high and wide to generate heat. Turn it with a tractor bucket or manure fork every couple of weeks to add oxygen. This speeds up decomposition and prevents that sour, ammonia smell. Always slope the ground away from the pile and consider a shallow berm around it to contain any run-off during heavy rains, protecting local waterways from nutrient overload. A tidy system prevents a mountain of problems.
Plan for Arena and High-Traffic Areas
Good footing prevents injuries. For an arena, choose a material that provides cushion and traction. Washed sand is a common base, but mixing it with a fiber additive or rubber chips can reduce compaction. Test footing by making a firm ball in your hand; it should hold shape briefly then crumble, never turning into a hard-packed or dusty mess. Water regularly to control dust, and harrow to break up compacted spots.
Gate areas, paths to shelters, and parking spots for trailers are mud magnets. Laying down a geotextile fabric before adding 4-6 inches of coarse gravel creates a stable, permeable base. This fabric acts like a shock-absorbing net, preventing stone from sinking into the mud while allowing water to drain. After installing it in our main gateway, the frustrating shoe-sucking mud vanished, much to the relief of my muck boots and the horses’ hooves.
Your Final Property Preparation Checklist
Walking your land before the horses arrive is a moment I always savor-the quiet hum of anticipation, the smell of turned earth, and the solid thud of your boot testing a fence post. This final walkthrough is where theory meets reality, and catching a detail now saves a world of worry later. Use this list not as a chore, but as your map to a smooth first day.
Pre-Move-In Verification List
Think of this as your closing inspection. I learned its value the hard way when a missed gate latch let Pipin stage a great escape before dinner. Run through each point physically, with your eyes and hands, not just mentally.
- Legal and Zoning: All permits acquired, insurance in place. This is the unglamorous bedrock. A quick call to your local zoning office confirms you’re clear for equines, and liability insurance is non-negotiable.
- Fencing: Entire perimeter secure, gates latch properly, no sharp edges. Run your hand along every rail and wire. A loose board or protruding staple is an invitation for injury. My old Quarter Horse, Rusty, once found the one weak spot in a mile of fence.
- Water: Supply tested, troughs clean, backup system ready. Taste the water yourself. Ensure automatic waterers refill and that you have a simple backup, like a spare trough, for power outages. Horses drink more than you think.
- Shelter: Run-in shed built, positioned for prevailing weather, bedded. It must be deep enough for all horses to use at once, with the open side away from your typical wind and rain. A layer of dry shavings or straw makes it inviting.
- Pasture: Soil tested, grasses established, rotation plan mapped. Don’t guess on your soil’s needs. Establishing good grass takes time, so have a rotation plan to prevent Luna from turning her paddock into a mud pit in one wet week.
- Waste: Manure collection site chosen, composting routine set. Pick a downwind, accessible spot for a pile or bin. A regular pickup schedule-daily is ideal-keeps flies down and pastures clean.
- Storage: Feed area rodent-proof, tools organized, emergency kit stocked. Use metal bins with tight lids for grain. Hang your tools. Your emergency kit needs vet wrap, antiseptic, and your vet’s number on the lid.
Ongoing Land Maintenance Notes
The real work begins after move-in, but it’s the rhythm of good care. Consistent, small efforts prevent big, expensive problems from ever taking root. This is where your land stays healthy for the long haul.
- Make a weekly ritual of walking fence lines, scrubbing water troughs, and removing manure piles. This keeps your environment safe and lets you spot a loose shoe or a subtle limp early.
- Schedule seasonal deep-dives: test soil nutrients every other year, clear drainage ditches before spring rains, and inspect shelter roofs after heavy snow. Mark these on your barn calendar.
FAQ: How to Prepare Your Land for Keeping Horses
What are the most critical steps for ensuring my horse land is properly prepared?
Start by verifying all zoning permits and insurance to legally keep horses on your property. Next, conduct a thorough land assessment to evaluate soil drainage and identify any toxic plants or risks. Finally, prioritize installing safe fencing and setting up reliable water sources before bringing horses home. These steps align with essential horse housing land requirements you should review. Familiarizing yourself with these requirements early helps ensure compliant, safe housing for your horses.
How can I prevent my horse from gaining too much weight on pasture?
Implement a managed grazing system with rotational paddocks to control grass intake and prevent overgrazing. Pair these practices with a weight-management diet tailored to your horse’s needs. Use tools like grazing muzzles or strip grazing to limit access to lush grasses that can cause rapid weight gain. Regularly monitor your horse’s body condition and adjust feeding plans to maintain optimal health.
What should I consider when planning for high-traffic areas like gates and feeding zones?
Designate well-drained, separate areas for feeding and gateways to reduce mud and waste. Use geotextile fabric and gravel bases to stabilize footing and prevent erosion in these spots. Ensure these zones are easily accessible for maintenance and sized to minimize bullying among horses. Proper planning of these areas is essential, especially when designing a pasture for horses.
Your Partner in the Pasture
Preparing your land is a foundational act of care, starting with secure fencing, clean water, and safe shelter. A successful horsekeeping setup isn’t about perfection on day one, but about building a resilient and adaptable property with a budget that always has a line item for the unexpected—especially when it comes to essential utilities for horse properties.
Move forward with patience, knowing that your best teacher is the land itself and the horses on it. Listen to what they tell you through their hooves, their grazing patterns, and their peaceful sighs at dusk.
Further Reading & Sources
- Pasture Management 101: Starting a New Horse Pasture from Scratch – The Horse
- 10 Steps to a Healthy Productive Horse Pasture – The Equiery
- Five Steps to a Great Horse Pasture | Northern Virginia Soil and Water Conservation District
- Establishing and Managing Horse Pastures | Equine Science Center
At Horse and Hay, we are passionate about providing expert guidance on all aspects of horse care, from nutrition to wellness. Our team of equine specialists and veterinarians offer trusted advice on the best foods, supplements, and practices to keep your horse healthy and thriving. Whether you're a seasoned rider or new to equine care, we provide valuable insights into feeding, grooming, and overall well-being to ensure your horse lives its happiest, healthiest life.
Stable Management